

Table of Contents
The Oculus Quest 2 headset has steadily gained popularity as a dependable virtual reality headset. If you have just finished installing Quest 2, this guide is for you on how to charge it. However, after some time, you may notice that the batteries in your controllers are running low. It can be quite annoying because it can cause the controllers to die unexpectedly. Because hand tracking, the most impressive feature of the Quest 2, is not available in many games, the controllers are nearly essential. Charge the Oculus Quest 2 controllers right away.
Oculus Quest 2 Specifications
The Oculus Quest 2 headset is the most advanced VR headset to date. To create such a sophisticated headset, the designers incorporated a number of powerful features. These features will allow the Oculus Quest 2 to support next-generation graphics. The following is the product description for Oculus Quest 2:
- Snapdragon XR2 processor from Qualcomm
- 6 GB of RAM, a resolution of 1832 x 1920, and a refresh rate of 90 Hz.
- Storage capacities of 64GB and 256GB
- Battery life of two to three hours for integrated audio and microphone
- IPD comes with three adjustable settings: 58, 63, and 68mm.
- The controllers have been completely redesigned.
Software Specifications:
Oculus Link requires the Oculus PC application. After downloading the PC application, make sure the Oculus PC software is current and the Quest is running the most recent operating system.
Why Aren’t Oculus Quest 2 Controllers Charging?
The Oculus Quest 2 VR headset can be charged by inserting any USB-C cable into the charging port on the headset. But why don’t the controllers have a charging port?
The primary reason is that touch controllers use very little battery power when in use. Numerous YouTubers reported that the controllers’ battery life remained at 100% after a month of Quest 2 gameplay.
ALSO READ: My Phone Says Not Registered On The Network How Do I Fix It?
How To Charge Your Oculus Quest 2 Controllers?
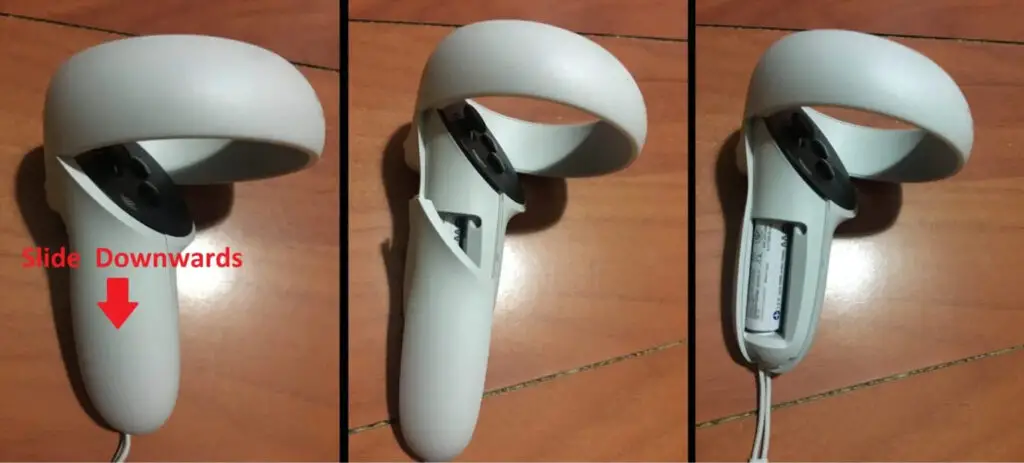
For some users, charging the Oculus 2 Controllers can be perplexing. Players must first remove the battery cover and insert rechargeable AA batteries before placing the controllers in the charging station and waiting for the light to turn green.
- Position the Oculus Quest 2 controller so that the eject icon is facing up, as shown below.
- To open the eject compartment, slide it upwards and away from you.
- The battery compartment will be made available. Take it off to reveal the dead battery.
- Substitute a disposable or rechargeable AA battery for the original. Ascertain that the replacement battery is inserted as directed.
- Rep the cover and repeat steps 1–4 for the remaining controller
Finally, there you have it! This is how simple it is to replace the batteries in the Controllers of your Oculus Quest 2 VR headset. They will be resurrected without any further action. Simply repeat the steps above to replace the batteries the next time your controllers lose power.
How To Charge in another way?
To begin charging the device, connect the charging cable to the Oculus Quest 2 Headset and a power source. The charging indicator will turn green once the battery is fully charged. If the player has not yet charged their Quest 2 headset, they should do so while the initial updates are downloaded.
The charging time for the Oculus Quest 2 is 2.5 hours. The Oculus 2 headset and controllers should be fully charged in this amount of time.
After removing the cover, the old AA battery should be removed and discarded. Replace the battery and the cover with a new one.
Purchase extra disposable batteries
Given how long Quest 2 controller batteries last, the most straightforward strategy is to buy disposable AA batteries ahead of time and keep them on hand for when the current batteries die. It is faster than recharging and will have you back to saber-slashing in no time.
The use of rechargeable batteries has an environmental advantage, but Quest 2 controllers require battery replacement so infrequently that it makes little difference. Especially since alkaline batteries are environmentally friendly. However, by using rechargeable alternatives, you can reduce waste.
If alkaline batteries are kept unconnected and in their original packaging, they have a long shelf life. Check the expiration date on the item and keep a pack in a drawer until you need it. Whether in a controller or elsewhere.
Instructions for Replacing the Quest 2 Controller’s Batteries
Are you prepared with a spare battery? As a result, take it and follow the installation instructions provided below.
- Position the Oculus Quest 2 controller so that the eject icon is facing up, as shown below.
- Make use of AA rechargeable batteries.
- The Quest 2 controllers work with any AA-sized battery that meets the voltage requirements.
- As a result, there are numerous rechargeable alternatives.
The majority of controllers charge four batteries in two-battery pairs. As a result, if you buy four NiMH batteries and charge them all, you’ll always have two charged batteries to swap.
We use USB-rechargeable lithium AA batteries because using a dedicated charger is inconvenient. Some of these batteries have a cap that can be removed and inserted into a USB-A port. Others include a charging port in each battery to allow for cable charging.
MUST-READ: Why Does My Phone Says Unfortunately System UI Has Stopped Working? (Easy Ways To Fix)